Friday, July 31, 2009

FLAPPER STYLE BABY HAT


This pattern is now available for purchase on Ravelry and Etsy, it is in sizes prem through to 18 months and made using 8 ply (DK, light worsted, sportweight) yarn).


Tuesday, May 12, 2009

CUPCAKE HAT


This hat pattern is now available for purchase from Ravelry and Etsy it uses 8ply (DK, sportweight) and is in sizes prem through to 18 months.

Friday, July 11, 2008

SHAZZAS SOCKS - mens version


This is my basic mens sock pattern that will fit a size 10.5 (Aus shoe), you can adjust the length of the foot to suit. The leg is made longer than I usually do for a womans sock and a few stitches added for the calves but once again this can be varied to suit.

Materials:
1 x 100g ball Opal Sock Wool
1 set of dpns size 2.5mm (or what is needed to get correct tension)

Tension:
36 stitches to 10cms (9 stitches to 1 inch in width).

abbreviations:
k - knit
p - purl
psso - pass slip stitch over

Using dpns size 2.5mm cast on 70 sts, join and work in the round. Work 20 rows k1,p1 rib.

Continues in stocking stitch (all rounds knit) until work measures 7 inches from the beginning, shape calf area as follows:
k1, k2tog, knit to last 3 sts, slip 1, k1, psso, k1.
work 5 rounds without shaping.
Repeat these 6 rounds once (66 sts)
Continue without shaping until work measures 23 cms (9 inches) from cast on edge.

SHAPE HEEL
knit 17 sts, slip last 17 sts of round on to other end of same needle (these 34 sts are for the heel). Divide the remaining sts on to two needles and leave for the instep.
Work 31 rows on heel sts as follows:
row 1. slip 1 stitch purlways, purl to end of the row
row 2. slip 1 stitch knitways, *knit, slip 1 stitch knitways, rep from * to the end of the row.

TURN HEEL
k19, k2tog, k1, turn
p6, p2tog, p1, turn
k7, k2tog, k1, turn
p8, p2tog, p1, turn
continue in this way, until all stitches are worked on to one needle. (20sts)

Using set of 4 needles, knit 10 sts. (thus completing the heel), slip all instep stitches on to one needle again. Taking another needle, knit remaining 10 sts. of heel, knit up 17 sts at the side of the heel, knitting one extra (18sts in total) in the corner to avoid that dreaded corner hole.
With a second needle, knit across instep stitches.
With a third needle, knit up 1 stitch in the corner to avoid the dreaded corner hole, knit up 17 sts at the side of the heel (18 sts in total) and remaining 10 sts of heel.

Knit 1 round, remembering to knit the corner sts together on needle 1 and 3(the extra two stitches that was knitted up previously to avoid the hole).

SHAPE INSTEP
1st round: - 1st needle, knit to last 4 sts., k2tog, k2; 2nd needle, knit; third needle, k2, slip 1, k1, psso, knit to the end of the needle.
2nd round: - knit
Repeat these 2 rounds until 64 sts remain in the round.

Continue without shaping until foot measures 19 cms (7 1/2 inches) (from where sts were knitted up at side of heel).

SHAPE TOE
1st round - 1st needle, knit to last 3 sts, k2tog, k1; 2nd needle, k1, slip 1, k1, psso, knit to last 3 sts, k2tog, k1; 3rd needle, k1, slip 1, k1, psso, knit to end of needle.
2nd round - knit.
Repeat these 2 rounds until 20 sts remain. Work 1 round without shaping then first needle of next round. Slip sts on third needle on to the end of first needle.

Graft stitches together using the Kitchener Method.


This pattern is for personal use only, the pattern or items made from it are not to be sold.
My knitting blog can be found here.
My Etsy shop can be found here where I have these socks available for sale if you would rather purchase a pair ready made.

Tuesday, May 20, 2008

THE BUCKET HAT

Okay here is the amended pattern, it has been test knitted by the lovely Melinda, thank you, your hat is gorgeous!


BUCKET STYLE HAT

2 x balls Rowan All Seasons Cotton
set of 3.5mm circular needles
set of 5.5mm circular needles
set of 5.5mm dpns

Using 3.5mm circulars cast on 150, join.
p 1 round, k 1 round (3 times)
p 1 round
*k13, k2tog repeat from * (140 sts)
p 1 round, k 1 round (twice)
p 1 round
k6, *k2tog, k12 rep from * knit any remaining stitches (130 sts)
p 1 round
k 1 round
p 1 round
*k5, k2tog rep from * to last 4 sts (112 sts)
p 1 round
*k2, k2 tog rep from * (84 sts)
p 1 round
Change to 5.5mm needles and knit decreasing 15 sts evenly around (69 sts) and begin lace pattern as follows:

Round 1: k1* yfwd, k2tog, repeat from * to the end of the round.
Round 2: knit.
Round 3: *sl 1, k1, psso, yfwd, rep from * to last stitch, k1.
Round 4: knit.
Continue until lace section measures 9 cms (3 1/2 inches)
p2 tog, purl to last 2 sts p2tog (67sts)
shape as follows in garter stitch as for brim (1 row k, 1 row p) changing to dpns when too few stitches for circulars.

Crown Shaping:
k1, *k4, k2tog, repeat from * to end of round.
purl 1 round.
k1, *k3, k2tog, repeat from * to end of round.
purl 1 round.
k1, *k2, k2tog, repeat from * to end of round.
purl 1 round.
k1, *k1, k2tog, repeat from * to end of round.
purl 1 round.
*k2tog, repeat from * to last stitch, k1.

Cut a long tail of yarn and thread onto a darning needle and thread through all the remaining stitches and pull up tightly as you go. Weave in ends and your hat is ready to wear.


This pattern is for personal use only, the pattern or items made from it are not to be sold.
My knitting blog can be found here.
My Etsy shop can be found here where I have these hats available for sale if you would rather purchase one ready made.


Monday, November 27, 2006

BRIMMED CAP


Materials:
2 50g 8ply (sport weight) wool
3 1/4 mm (US 3) and 4 mm (US 6) short length circular needles
4 mm (US 6) straight needles
stitch marker

Tension (gauge)
22 stitches - 10 cms (4 inches)

Size: one size fits most

Using 3 1/4 mm (US 3) circular needles cast on 120 stitches and join, being careful not to twist stitches, place marker and work in k1, p1 rib for 6 rounds. Change to 4mm (US 6) circulars and work in stocking stitch (all rounds knit) until work measures 16 cms (6 1/4 inches) from beginning.

Shape crown:
using a set of double point needles makes this easier.
1st round - *k2 tog, k6 repeat from * to end.
2nd round - *k2 tog, k5 repeat from * to end.
3rd round - *k2 tog, k4 repeat from * to end.
4th round - *k2 tog, k3 repeat from * to end.
5th round - *k2 tog, k2 repeat from * to end.
6th round - *k2 tog, k1 repeat from * to end.
7th round - *k2 tog, repeat from * to end.
Break off yarn leaving a long end and draw through stitches pulling tightly and secure.

Peak
Using 4mm (US 6) straight needles cast on 17 stitches.
1st row - k1, p1 to end of row.
2nd row - k1, *k1, p1, repeat from * to last stitch, k1
Continue in rib, casting on 3 stitches at beginning of every row fourteen times (59 stitches). Work 1 row without shaping, cast off.

Peak Facing
Using 4mm (US 6) straight needles cast on 15 stitches.
1st row - knit.
2nd row - purl.
Continue in stocking stitch, casting on 3 stitches at beginning of every row 10 times (45 stitches).
Work 1 row without shaping, cast off.

Making up
Sew in ends and placing right side of peak facing to right side of peak, sew front seam then turn to right side. Using a flat seam, sew peak to main section of hat.

This pattern is for personal use only, the pattern or items made from it are not to be sold.
My knitting blog can be found here.
My Etsy shop can be found here where I have these hats available for sale if you would rather purchase one ready made.

Saturday, April 15, 2006

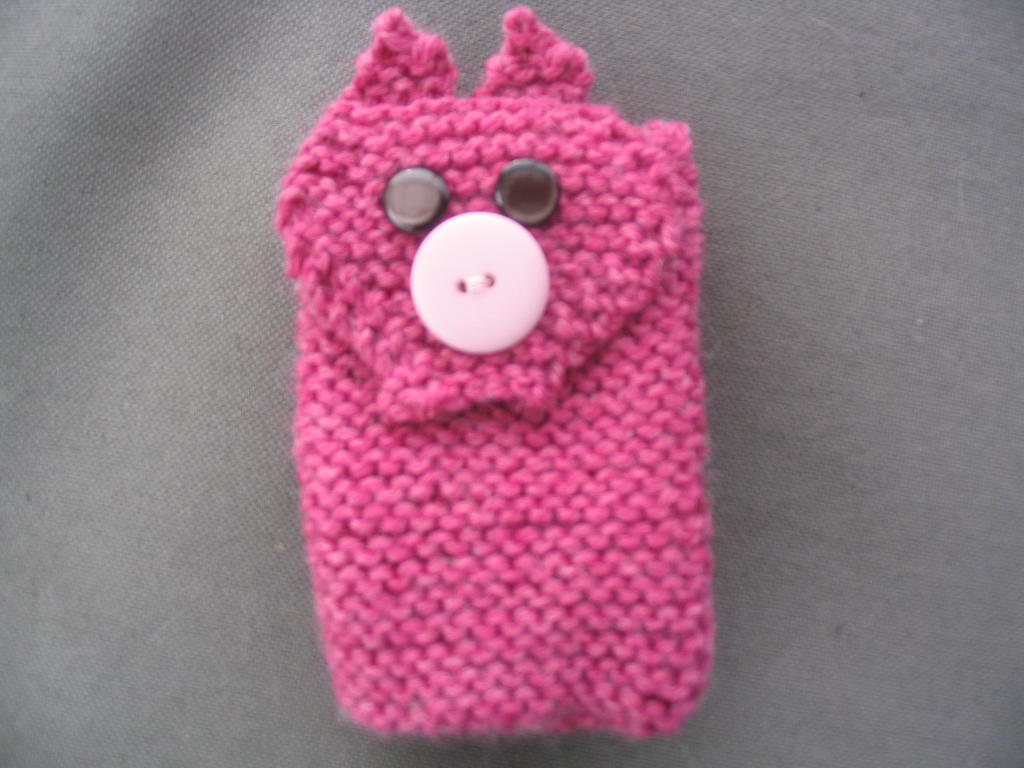
PIGGY PHONE/IPOD COVER


Janelle asked me to make her a cover for her Ipod so I used the pattern Mobile Monsters from Stitch 'N Bitch Nation by Debbie Stoller. I used 8ply Bendigo Wool on 3.75mm needles. As there is copyright on this pattern you are going to have to go buy the book, but I can pass on to you the tail as that bit I added myself, as a pig has to have a curly tail. The tail is made as follows:

Cast on loosely 10 sts
Row 1 (k1, k1 tbl, k1) in each stitch across
Row 2 Cast off purlwise.
Twist into shape, and there you have a little tail.

My knitting blog can be found here.
My Etsy shop can be found here.

Monday, February 06, 2006

MUSE HAT


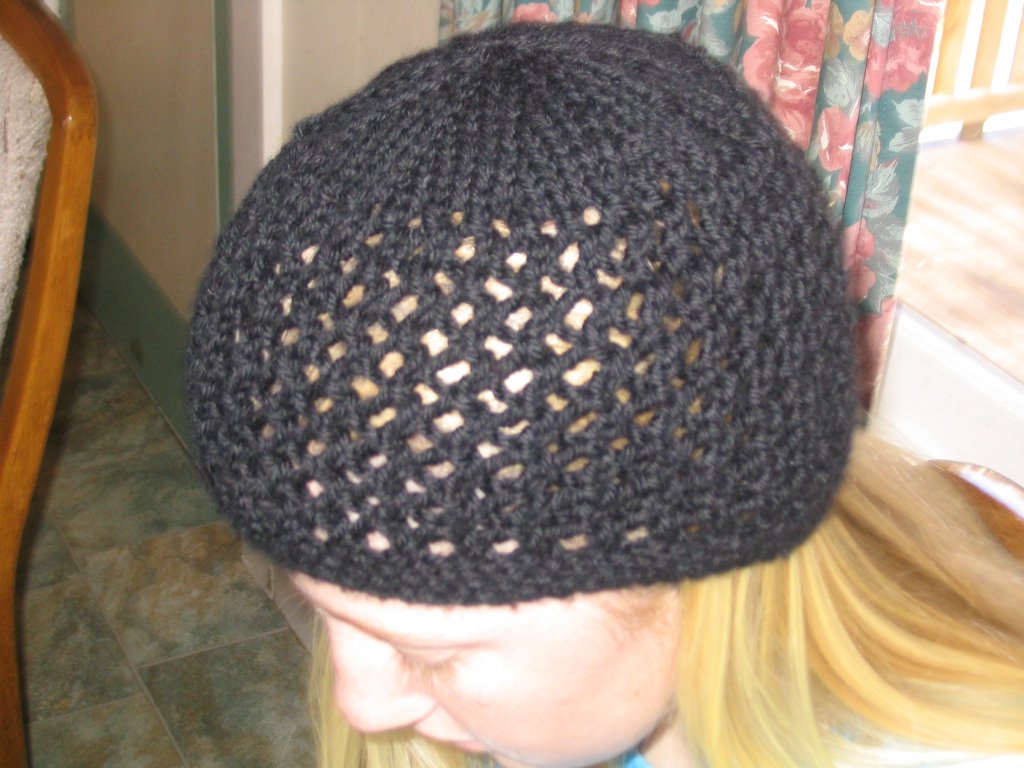
I love crocheted hats but unfortunately I cannot crochet. Many years ago I remember knitting a jacket which had a stitch pattern that looked just like crochet so after sorting through my old pattern books I found the pattern and used it to make my Muse Hat. Why Muse you ask? It reminds me of the hats that the beautiful wives / girlfriends of famous musicians and artists were always pictured wearing in my mums New Idea magazines during the '60s and '70's, complete with the false eyelashes and long hair. It is being modelled here by my DD, who loves the hat so I think I will have to knit myself another one.

Materials:
2 x 50gram balls of Cleckheaton Natural 12ply
5.5mm circular needles (40cm length)
1 x set 5.5mm double pointed needles
1 stitch marker

Tension:
16sts per 10cm in moss stitch (k1, p1 rib)

Using 5.5mm circulars cast on 69 sts, join and place a stitch marker to mark the beginning of the round.
Round 1: k1, p1, repeat to the end of the round.
Round 2: p1, k1, repeat to the end of the round.
Continue working in moss stitch as established, 4 more rows (6 rows in all).
Begin pattern:
Round 1: k1* yfwd, k2tog, repeat from * to the end of the round.
Round 2: knit.
Round 3: *sl 1, k1, psso, yfwd, rep from * to last stitch, k1.
Round 4: knit.

Last 4 rows form pattern, work in pattern until work measures 12cms from cast on edge, ending with a round 4.

Next row k2tog, knit to last 2 stitches of the round, k2tog (67 sts)

You can change to double pointed needles now or later when there are too few stitches for the circulars.

Crown Shaping:
k1, *k4, k2tog, repeat from * to end of round.
knit 1 round.
k1, *k3, k2tog, repeat from * to end of round.
knit 1 round.
k1, *k2, k2tog, repeat from * to end of round.
knit 1 round.
k1, *k1, k2tog, repeat from * to end of round.
knit 1 round.
*k2tog, repeat from * to last stitch, k1.

Cut a long tail of yarn and thread onto a darning needle and thread through all the remaining stitches and pull up tightly as you go. Weave in ends and your hat is ready to wear.

This pattern is for personal use only, the pattern or items made from it are not to be sold.
My knitting blog can be found here.
My Etsy shop can be found here where I have these hats available for sale if you would rather purchase one ready made.

Monday, January 30, 2006

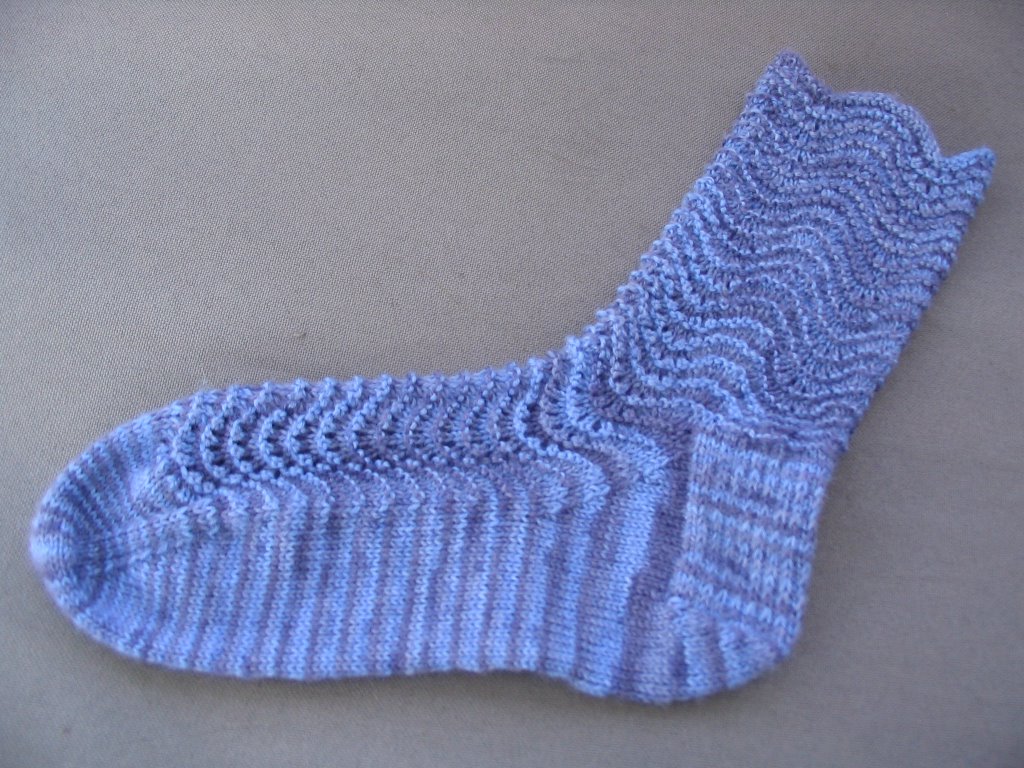
FEATHER AND FAN SOCKS


There are many variations of these socks available, here is how I made mine. They will fit a small/medium womans foot.


100g 4 ply sock wool (I used Patons Patonyle)
1 set 2.75mm double pointed needles
tension (what tension, they're socks) I use 2.75mm needles as I knit tightly, some prefer 2.25mm.

Leg:
Cast on 72 stitches loosely, divide over 3 needles (18, 36, 18) and join.
Round 1:purl
Round 2:knit
Round 3:knit
Round 4:*k2tog (three times), yfwd k1(six times), k2tog (three times), repeat from * to end of the round.
Repeat these 4 rounds until leg measures 15cms or length desired.

Heel Flap:

Turn your work so that you now have wrong side facing and work heel flap as follows:
Row 1:Sl 1, P35, (distribute the remaining 36sts evenly over 2 needles to be used for the foot later), turn,
Row 2:*Sl 1, k1, repeat from * to end of the row, turn,
Work these two rows until heel flap is 5.5cms, ending with a purl row.

Turn Heel:
Row 1:Sl 1, K20, SSK, K1, turn
Row 2:Sl 1, P7, P2tog, P1, turn
Row 3:Sl 1, K8, SSK, K1, turn
Row 4:Sl 1, P9, P2tog, P1, turn
Row 5:Sl 1, K10, SSK, K1, turn
Row 6:Sl 1, P11, P2tog, P1, turn
Row 7:Sl 1, K12, SSK, K1, turn
Row 8:Sl 1, P13, P2tog, P1, turn
Row 9:Sl 1, K14, SSK, K1, turn
Row 10:Sl 1, P15, P2tog, P1, turn
Row 11:Sl 1, K16, SSK, K1, turn
Row 12:Sl 1, P17, P2tog, P1, turn
Row 13:Sl 1, K18, SSK, K1, turn
Row 14:Sl 1, P19, P2tog, P1 turn
Row 15:Sl 1, k21

Gusset:
Using needle 1, pick up 18sts including 1 stitch in the corner where the heel flap and instep join to prevent a hole, along the heel flap.
Using needle 2, work across the instep in Feather and Fan pattern.
Using needle 3, pick up 1 stitch in the corner where the heel flap and instep join and then pick up 17sts along the other edge of heel flap (18sts)
Then knit across 11 stitches on needle 1 so that now you will have (29, 36, 29) to work your gusset.
Round 1: needle 1-knit to last 3sts, K2tog, K1; needle 2-work in feather and fan pattern; needle 3-K1, SSK, Knit to the end of needle 3.
Round 2: Knit.
Repeat these 2 rounds until you have 72sts. (18, 36, 18)


Foot:
You will continue to work needles 1 and 3 in stocking stitch and feather and fan on needle 2 only until foot measures 16cms or desired length (5.5cms shorter than actual foot length).

Toe:
Round 1: needle 1-knit to last 3sts, K2tog, K1; needle 2-K1, SSK, work to last 3 sts, K2 tog, K1; needle 3-K1, SSK, knit to end of round.
Round 2: Knit.
Repeat rounds 1 and 2 until 24sts remain.

Graft toe.

If you have any questions or if you find any mistakes (I have double checked but you never know) please email me.

My knitting blog can be found here
My Etsy shop can be found here.

Tuesday, November 08, 2005

HACKEY SACKS


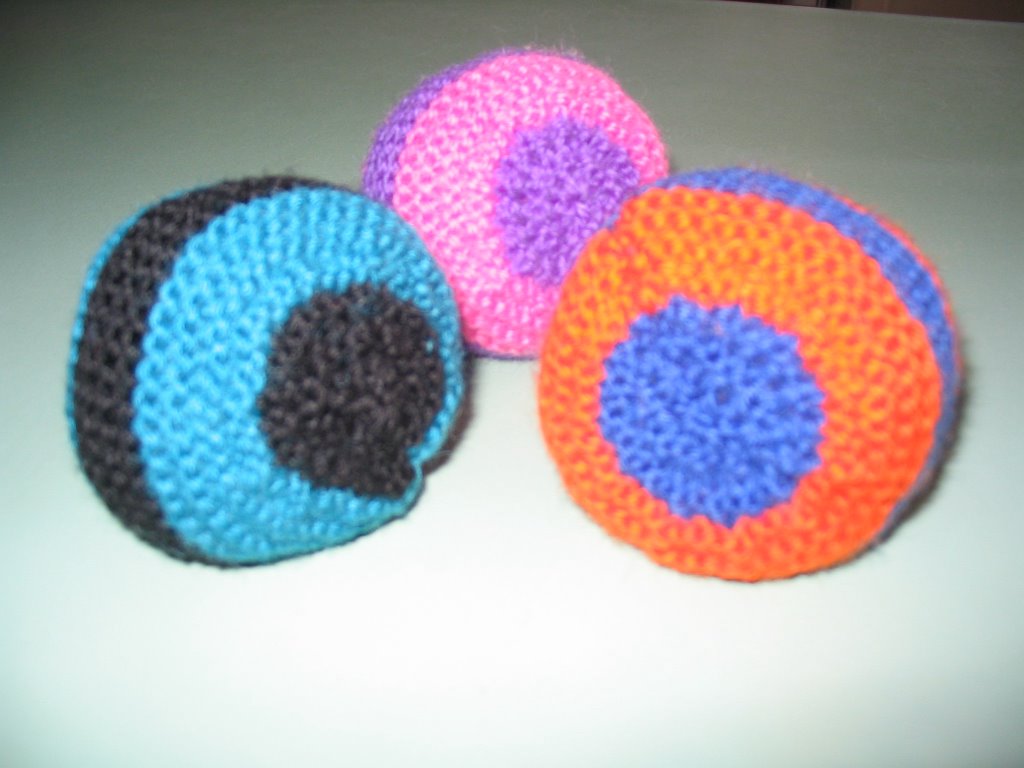
Ashley wanted to sell hackey sacks at his school fair and after many attempts at getting the size correct this is the pattern for them. I stuffed them with bear pellets, available from craft shops, you could use beans, rice or wheat. A bit of patience is required with the first few rows, knitting a bit looser than normal helps until all the stitches are increased.

Scraps of 8ply yarn
3mm needles

Using MC, cast on 9sts.
increase into every stitch - 18sts.
Knit 1 row,
inc. into every stitch - 36sts,
Knit 1 row,
*K2, inc. in next stitch, repeat from* to the end - 48sts.
Using C2 knit 8 rows garter stitch (knit every row),
Using MC knit 8 rows garter stitch,
Using C2 knit 8 rows garter stitch.
Using MC *K2, K2together, repeat from * to the end - 36sts.
Knit 1 row,
*K2 tog, repeat from * to the end - 18sts,
Knit 1 row,
*k2 tog, repeat from *to the end - 9sts,
cut a long tail and thread through the remaining 9 stitches and pull tightly, sew hole at the top closed and sew up side seam. Stuff with bear pellets and sew the end, you can vary your choice of colours to suit.


My knitting blog can be found here
My Etsy shop can be found here.

Monday, August 15, 2005

ARAN TWEED WRAP


Aran (10 ply, Worsted) wool in tweed colours,
MC - green x 100g
C1 - light blue x 100g
C2 - medium blue x 100g
1 pair 4.5mm needles (size 7 US),
cable needle,
tension: 19sts - 10cms on 4.5mm needles

CBR= Slip 4 sts onto cable needle and hold at front of work, knit 4, knit 4 from cable needle.

CBL= Slip 4 sts onto cable needle and hold at back of work, knit 4, knit 4 from cable needle.

CABLE PATTERN (CP)
Row 1: p2, k12, p2
Row 2: k2, p12, k2
Row 3: p2, CBR, k4, p2
Row 4: k2, p12, k2
Row 5: p2, k12, p2
Row 6: k2, p12, k2
Row 7: p2, k4, CBL, p2
Row 8: k2, p12, k2
Repeat rows 1 to 8 throughout.

Cast on 80 sts. using MC
Row 1: (k1, p1)16 times, Cable Pattern, (p1, k1)16 times
Row 2: (p1, k1)16 times, (CP), (k1, p1)16 times
Row 3: As row 2
Row 4: As row 1
Change to C1
Row 5: As row 1
Row 6: As row 2
Row 7: As row 2
Row 8: As row 1
Change to C2
Row 9: As row 1
Row 10: As row 2
Row 11: As row 2
Row 12: As row 1
Last 12 rows form pattern, continue throughout, working cable pattern as set until work measures 115 cms or length desired.

My knitting blog can be found here
My Etsy shop can be found here.

Thursday, August 11, 2005

FACE WASHER


This is an old baby blanket pattern which I have shortened considerably and made into a face washer.
You will need 1 ball of Patons Velveteen and 1 pair of 4mm needles
tension: what tension, it doesn't matter

Cast on 4 stitches,
Knit 2, yfwd, knit to the end of the row.
Repeat this row until the required width of your washer.
Knit 1, knit 2 together, yfwd, k2 together and knit till the end of the row. Repeat this row until 4 stitches remain, cast off. Sew your cast on and cast off tails in and voila a facewasher.

I wrap one of these up with a nice soap or foam wash and you have a nice present for someone special.

Now if you would like to make a simple baby blanket or throw, just use this same pattern with whatever yarn you like and then look through any stitch pattern guide and find a nice lace pattern using about 6 - 10 sts and make it the length that when slightly stretched it will fit around the edge of the blanket and then sew it on. Or if you are one of those clever people who can crochet, you can make a nice trim around the edge. Bendigo Woollen mills 8ply machine washable yarn works well for baby blankets.

My knitting blog can be found here
My Etsy shop can be found here.
Wednesday, August 03, 2005

SHAZZAS SOCKS


1 100 gram ball Opal sock wool
1 set 2.75mm double pointed sock needles (I am a tight knitter so this size needle suits, if you are a loose knitter, use 2.25mm)

This is a ladies medium fitting sock.

Using No. 2.75 needles, cast on 64 sts. Divide sts on 3 needles (20 - 24 - 20). Place a marker between the first and second sts. to indicate the beginning of the round and join the work.
Work k1, p1 rib for 20 rounds.Next round - Knit.Continue in this way (knit every round) and work until leg measures 21cms from the cast on edge.

NOW THE FUN PART, BEGINNING OF THE HEEL
Knit 16 sts, slip the last 16 sts of round on to other end of same needle (these 32 sts are for the heel) . Divide remaining sts. on two needles to be worked later for the instep.
With wrong side facing sl 1, purl 30, k1

Work 5.5cms (or desired length) as follows ending on a right side row.
Row 1: (RS) Slip the first stitch as if to purl (k1, slip 1) across, ending k1.
Row 2: Slip 1 as if to purl, purl 30, k1

NOW TURN THE HEEL
Row 1 (wrong side) Slip 1, p16, p2 tog. p1, turn
Row 2 Slip 1, k3, ssk, k1, turn
Row 3 Slip 1, p4, p2 tog. p1, turn
Row 4 Slip 1, k5, ssk, k1, turn, Continue in this manner, until all sts. are worked onto one needle. (18sts)

NOW WORK THE INSTEP
Pick up 14 sts. along the edge of the heel flap, work across the sts on the two needles for the instep, knitting them onto one needle as you go. With spare needle pick up 14 sts along the second edge of the heel flap, knitting 9 sts from the heel needle onto this needle (23 - 32 - 23)

DECREASE INSTEP
Round 1: 1st needle - knit to last 3 sts, k2tog,k1; 2nd needle - knit; 3rd needle - k1, ssk, knit to end of the round.Round 2: KnitRepeat these two rounds until 64 sts remain in the round.

WORK THE FOOT
Continue without shaping until foot measures 17 - 18cms (or approximately 6.5cms less than the length of the persons foot that the sock is for.

SHAPE THE TOE
Round 1: 1st needle - work to 3sts from the end, k2 tog, k1; 2nd needle - k1, ssk, knit to last 3 sts k2tog, k1; 3rd needle - K1, ssk, knit to the end of the round.
Round 2: knitRepeat 1st and 2nd rounds until24 sts. remain in the round. Knit sts of 1st needle on to the end of the 3rd needle.
Graft these sts together.

This is the pattern that I use for knitting my socks it has the best bits that I have tweaked from many sock patterns over time in a quest for perfecting a sock pattern that is both easy to knit and wears well.

This pattern is for personal use only, the pattern or items made from it are not to be sold.
My knitting blog can be found here.
My Etsy shop can be found here where I have these socks available for sale if you would rather purchase a ready made pair.